Wednesday, February 29, 2012

Kitchen Phase 2: Round 2!

I am done with the cabinets!


It took FOREVER to finish sanding and staining and sealing the cabinet doors. I had to work on them three or four at a time with a week or two in between because Jan and Feb have been SO busy for me! This post has taken two or three attempts to finally publish!

I wish the counter tops and floors were done for the full effect, but whatcha gonna do with limited funds and time!?!

I think everything came out really well, however, the sections below the stove did not come out as evenly as I would have hoped. I think my drawers were made from a different kind of wood as my cabinet doors, and on top of that I think they were all made from fake woods while the base cabinets were actually real. This made for some funny differences in textures and "character" lines. I'm thinking in another year or two I will probably end up doing a antique white paint job over the whole lot. For now, though, I will enjoy my hard work!

I had to do four or five layers of polyurethane on top of the finish to get the finish the way I wanted.

Hope ya like them!

-S

Sunday, January 8, 2012

Kitchen Phase 2: Round 1

Well not new... just refurbished.

OH MAAA GAAAASSHHHHH

My friend and I finally got around to picking up some cabinet stain and by the time we got home from our quick Lowes run, I was WAY pumped. So at 6pm, the "little" project began! I didn't clean up till around 10.

Vacuum attached to help with dust.

I have had really good luck with Skil branded stuff. I used my Skil sander for most of the sanding.  In previous blogs I have mentioned tools that have been really helpful to me. I have referred to these tools as "my" tools. Unfortunately, they are not all mine. Some are my husbands tools and he wanted me to be sure that you knew this! Now that's out of the way, here we go!


I advise wearing some sort of ear protection.
Once all of the cabinets were empty, I took the doors off. The doors still need to be sanded, but this project isn't even close to being done. Anything I couldn't fit in the lower cabinets, I covered with sheets. I used sheets instead of plastic because I was worried that when the cleanup started, the dust would just fly off the plastic sheets. The dust kinda stuck to the cloth sheets and I was able to fold them up and get them into the laundry without making an even bigger mess.
Oops

In my haste to begin the project, I left a few things out on the counter. OOoooops!

I almost forgot to sand the inside edges of the cabinets. I was aaaallllmost finished when I realized this sad detail, and it made the project feel like it took forever.


 It got pretty messy. But between old clothes and swiffer wet mops, cleanup wasn't too bad.
The next afternoon I made tortellini over the stove. My stove MAJORLY started to smoke. I think I may have gotten some wood dust in the catcher thingy below my burner! I cleaned it all out and things were fine, but it kinda smelled like a bonfire!
Soooo Purdy!!!!
Tomorrow I plan on doing the rest of the kitchen.


Here's my Plan Of Attack! :
~Sand Cabinet Faces
~Stain and Seal Cabinet Faces
~Put Stuff Back In My Cabinets
~Sand Cabinet Doors
~Stain and Seal Cabinet Doors
~Be SUPER Excited.

I figured I didn't need the doors to be able to utilize my cabinet space. If I do the doors last, then I have a functional kitchen much much sooner! Plus I can sand the doors outside where the clean up will be virtually nonexistent!

Cant wait to get started again!!

-S

Friday, January 6, 2012

Pinterest Spectacular

I have recently been introduced to Pinterest.com and I am officially obsessed. I have a few qualms with people mislabeling their posts, which gets them mixed into the wrong categories. If you didn't make it yourself, or it wasn't made by hand... don't put it in the DIY category... put it in products. I guess that's my kind of OCD. I'm sure ill get over it in like.. wait what was I going on about??

This picture doesn't do it justice.
So I saw a post where someone used a curtain rod to hang pictures across a wall. Then later I saw someone doing something with a tree branch. I don't quite remember what they did with the branch, and it might possibly be what I ended up doing... but I just don't remember!! Regardless, I can't take full credit for this DIYer!

I LOVE MY ENTRY WAY!!!!!!

All I did was take a branch that had fallen from my front yard tree, spray-paint it black, hang it on my wall, and tie my picture frames to it using some relatively thin ribbon! VIOLA!!!!

-S

Friday, December 30, 2011

Home Away From Home

We have two dogs; a Pointer and a Newfie. The boys love to make messes together. Normally I don't mind a stuffed animal graveyard in my living room, but with the Newfie, the stuffed animal grave yard tends to be waterlogged with drool. He drools when he drinks and when he chews. I am grateful he rarely has "danglers"(those disgusting dangling thick drool strings hanging from the sides of a dogs mouth). The boys favorite things to do include chewing bones, killing stuffed animals, and wrestling in the yard. They prefer the latter over ANYTHING else.

This is all why I decided that outside is the best place for the boys when I am not home. This gives them time to play together and effectively dispose of yucky wet toys without creating a soggy mess on my living room floor. The only problem with such an idea is that cold weather is not a friend to our Pointer. We are running into the winter months quickly, and while we still have few nice days like today, they are not going to last long. My poor little Pointer wants to be outside so badly, but he gets soooo cold that he runs outside and within a few minutes is shivering at the doorstep.

Lowes cut my wood to fit in my car.
I got another crazy hair the other day and decided to build him a dog house! It is so cute!!!! It has a little porch and the roof comes out over it a little bit. I made a hole in the back to hold my little space heater so he will be nice and cosy.  The plan is to eventually put the dog house next to my outside dryer vent and run a few loads in the dryer when he is outside! Multitasking!  Here are some pictures of the build. I had a couple of friends help out and we had a blast! We ended the day with Fajitas, chips, and salsa!

Measure once, cut twice... or is it the other way around??
Most of my projects involve cutting wood with the skilsaw. I should really invest in some saw-horses. I usually find myself improvising my cutting surfaces by using anything I can get my hands on. Today I used some left over logs from the outdoor bench I made a month or two ago. Probably not the safest...

A Straight Edge is reeeeally convenient.
Another tool I have come to rely on is my 90 degree angle thingy. I am sure it has a real name... but I haven't been bothered to find out.

We basically just made a frame with the two by fours and then slapped some plywood on the outside. The guys at Lowe's were super sweet and cut the plywood so that it would fit in my car. I don't like to tie things to the top, so making it fit is pretty important to me.  You just have to be sure that when they cut it, they are strategic about it. I had the guys cut my board into the right size pieces for my project. It saved me three cuts.
We Dremelled the longer screws.

It needs to be painted because if plywood gets wet, it will more than likely swell and rot. Ill have more pictures soon of the finished project. I painted it an off white and have decided it looks too plain. You cant be too picky when using "oops paint" in Lowes paint department. I'll update this post when I have gotten around to making it look more interesting!

-S

I hinged the roof for easy cleaning.


UPDATE: While we still use this doghouse during the day while we are home, we have decided to discontinue leaving the dogs outside while we are gone during the day, due to an increased number of doggie kidnapping. Better to be safe than sorry. This article made me ridiculously sad. I had a friend show me a picture of a husky that had been stolen and recovered. They found the husky with her face, and feet duct taped... These sick people dont just trot your dog off with a wagging tail... they seize them violently...

Friday, December 16, 2011

I Underestimated Myself

I am SO wowed by what I did today.

It all started a month or so ago when a friend of mine was looking through a kids magazine or something. She saw a wooden step stool that had custom writing puzzle, pieced into the top step. I thought that it looked ridiculously cute but that it was kind of pricey.

Today I got a wild hair when I saw the pile of extra wood from the drawers. I went online and looked at a bunch of other stools since I couldn't find the original, and set to work creating my own.

I just whipped out my circular saw and jerry rigged a workbench using the bumper of our Jeep. After cutting the shapes for the sides,  I sanded the edges and took a little off the bottom in the middle to make it look like legs. That just made me think of the Leg lamp from A Christmas Story.

The only things I had to purchase for this project (since the wood was technically leftover) was a pack of special screws and some new blades for my coping saw. I learned how to use a coping saw one time in the seventh grade. Our school required all seventh graders to take a two week sample course of each elective that was offered at our school. So for two weeks I immersed myself in safety goggles and the intellectual droning of Mr Wynn. The toughest piece of equipment we were allowed to use was the router. It was SO cool. So cool in fact: that about two months ago I was at an estate sale, and the highlight of the day for me was walking home with my new(used) router!! Wow I definitely get sidetracked...

The one on the left isn't sanded yet.
Anyway, I learned in one day how to use a coping saw and for some reason it was one of the things that stuck. I used it today to cut the letters, and the frame for the letters. I used a sharpie to trace some letters I printed from the computer. No freestyle sawing for me! That would have turned out HORRIBLE. I broke my first "R" but after that, I kind of got the swing of things again.

The clamp was a MUST.
After I cut out the letters, they were in dire need of some sanding because there were funky edges all over the place! Enter: sand paper and file/rasp thingy.

After that, I arranged the letters on the piece I was going to use for the frame, and traced an outline so I would have a guide. Again, NO freestyle cutting for me! Disasters can be averted by learning from MANY past mistakes!! *oops!*
The blade is on the inside. No edges were cut.
I got the coping saw on the inside of the frame by taking it apart and putting it back together with the blade on the inside. To start it out, you just have to drill a hole in the wood big enough for the blade to pass through. I didn't do that great of a job making clean lines on the frame either, so I employed the temporary services of the file/rasp thingy again!

The file/rasp thingy!
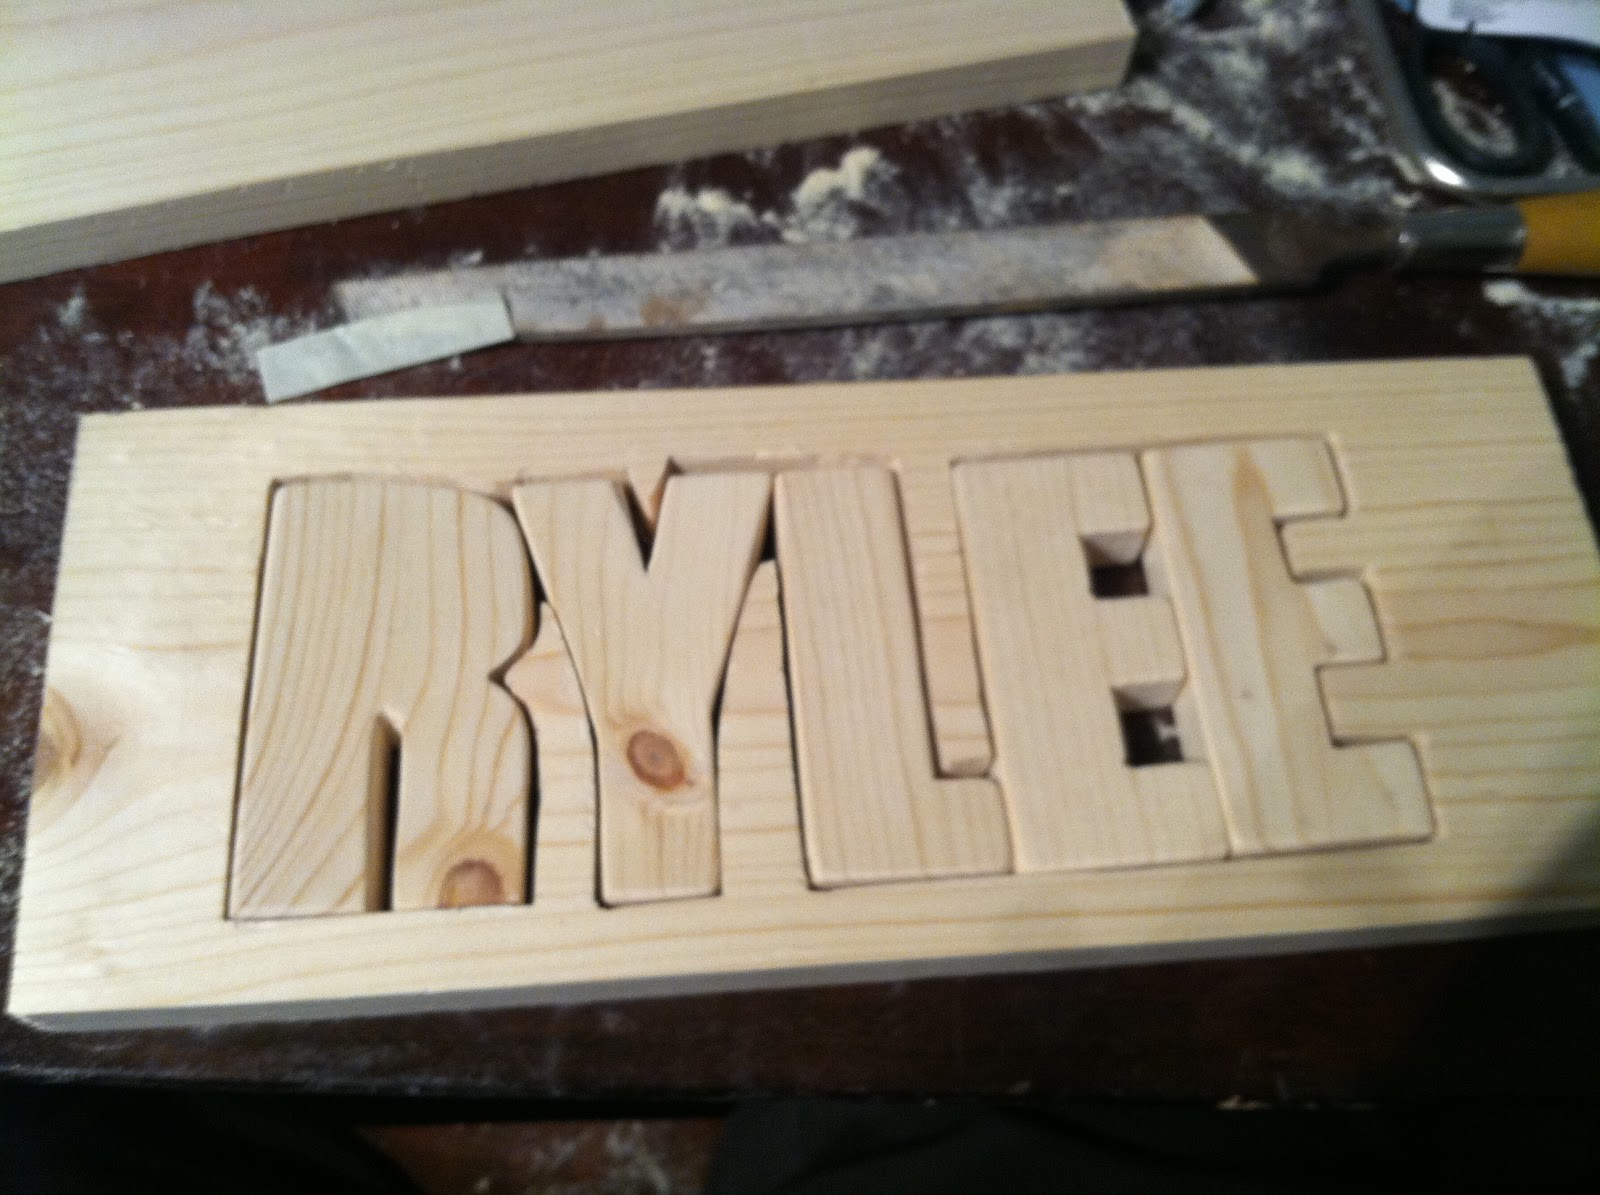
Then the sandpapering began. I sanded all the pieces of the step stool until they were baby soft. It took FOREVER. The "E"'s were the worst; So many tiny areas to cram sandpaper into!! All edges and corners were sanded down because I don't want my Godbaby, Rylee, hurting herself on a sharp edge!!

The letters, of course, did not fit their little puzzle frame, so I begged the file/rasp thingy to give me one more hour of its precious time. I paired it with some 80 grit sandpaper to make sure there was enough room around each puzzle piece to wiggle. I ended up using a huge drill bit to make a hole for the "R" because I didn't think it was a big enough space to risk ruining it with my crummy coping saw skills. I might have taken the chance, except that I knew I wouldn't be able to get any sandpaper into such a tiny hole to fix it!

As an afterthought I put some wooden wedges on the underside for support.  Now, even fatty me can stand on this thing without worrying!

They fit!!
Support triangles! Do you also see the leg effect?

Frame on top of top step.
Well I hope you like my wild hair! I was extremely excited about how good it turned out!! When Rylee is old enough to stand on stuff, this should be a real helpful item. I love her so much, and hope she has this thing forever! She comes from a family of shorties, so she may still need it when she grows up ;) For now I think it will probably be used as a puzzle and just a nice furniture piece haha. Its a good present for an infant, right?? lol


-S
The grain of the wood is in a different direction for the letters than the surrounding frame. This makes the letters stand out better in good lighting.